How to Cook Japanese Rice in a Staub Pot
Rice is at the heart of Japanese cuisine, and cooking it is one of the most essential (and simple!) skills to learn. In this post, I’ll show you how to cook fluffy Japanese rice using a Staub pot. Master the basics and enjoy authentic Japanese-style meals at home!
No Staub pot? You can also use a pressure cooker or a regular saucepan to cook the rice!

Why You Will Love This Recipe
Recipe Ingredients
Here’s what you’ll need to make Japanese rice on the stovetop.

Cooking Equipment
Here is the equipment for cooking Japanese rice on the stove.

How To Make Japanese Rice: STEP BY STEP
Here’s a quick visual guide! Check the recipe card below for the video and full details!

Step 1
Rinse the rice (see blow for more details) and soak it in water for 30 minutes.

Step 2
Drain the rice, add fresh water, and bring it to a boil.

Step 3
Simmer for 10 minutes, turn off the heat, and rest for 10 minutes.

Step 4
Fluff with a rice paddle

Your rice is ready to serve! It’s fluffy and pairs perfectly with any dish. To learn how to enjoy it, check out the following section.
How To Rinse the Rice
To cook delicious rice, it’s important to remove the bran and any dirt on the surface of the polished rice. The key is to rinse quickly—rice absorbs water fast, and with it, the smell of the bran!
Recipe Tips

Got hard or mushy rice? No worries— Check out my tips for how to fix hard rice and how to fix mushy rice, so you can save your rice and still enjoy your meal!
How to Enjoy Japanese Rice
Once you’ve cooked the rice, let’s enjoy it the Japanese way!

Storage
If you have leftover rice, wrap individual servings in cling wrap and store them in the freezer. They will remain fresh for up to one month.

The key is to wrap the rice in cling wrap immediately, even if it’s still hot. Allowing the rice to cool before wrapping will cause the moisture to evaporate, resulting in dry rice. Additionally, storing rice in the fridge is not recommended, as it can cause it to dry out.
Your Questions Answered
If you don’t soak rice before cooking, it may become hard and lose its sweetness and stickiness. Soaking rice allows the grains to absorb water, resulting in fluffier, more tender, and delicious rice.
Soak rice for 30 minutes to one hour. Consider soaking for up to an hour in colder weather, as water is absorbed more slowly in cooler temperatures.
Yes. Like washing vegetables before cooking, you should wash away all of the dirt, rice bran, or other elements included during the rice milling process.
The best method for cooking Japanese rice depends on personal preference and convenience. Each method has its advantages:
*Stovetop: No special tool is required; you can use a pot you have, but it requires attention to prevent burning.
*Rice Cooker: Convenient and foolproof with consistent results.
*Pressure Cooker: Quick and efficient, great for busy individuals.

Want more Japanese Plant-Based Ideas?
Get 10 Easy
Vegetarian recipes

More Rice Recipes You Will Love
Leave a Rating!
I hope you enjoy this recipe! Don’t forget to rate it and share your thoughts!
How to Cook Fluffy Japanese Rice in a Staub Pot

Equipment
Ingredients
Instructions
- Rinse: Rinse the rice with cold water 3–4 times quickly to remove any rice bran from the grains (See how to rinse rice for more details.)
- Soak: Soak the rice in water for 30 minutes to help it cook evenly and achieve a fluffy texture.
- Bring to a boil: Drain the rice, add the water, and bring it to a boil over medium heat.
- Simmer: Once it boils, stir the rice gently with a shamoji to distribute the heat evenly. Then, reduce the heat to low, cover the pot with a lid, and simmer for 10 minutes.
- Rest: Turn off the heat, and let the rice rest with the lid on for 10 minutes. This helps the rice finish cooking and absorb the remaining moisture.
- Fluff: Remove the lid, and gently fluff the rice with a shamoji to separate the grains and make it nice and fluffy.
Notes
- Storage Tip: Wrap individual portions of rice in plastic wrap and freeze them. It’ll keep well for up to 1 month and is easy to reheat.
- Rice-to-Water Ratio: Use 1.1 to 1.2 cups of water for every 1 cup of rice.
- Quick Rinse: Rice absorbs water fast—along with any dirt or bran—so rinse it quickly (3–4 times).
- Soaking Time: Soak the rice for at least 30 minutes before cooking. This ensures even cooking and helps the grains become nice and fluffy.
- Old Rice Adjustment: If you’re using rice that’s been stored for over a year, it tends to be drier. Add 1.3 cups of water for every 1 cup of rice to help rehydrate it properly.
- If your rice is hard or mushy, check out my tips for how to fix hard rice and how to fix mushy rice.
Video
Nutrition
This nutritional information is estimated and provided for general reference only.
Did You Make This Recipe?
Please leave a review!!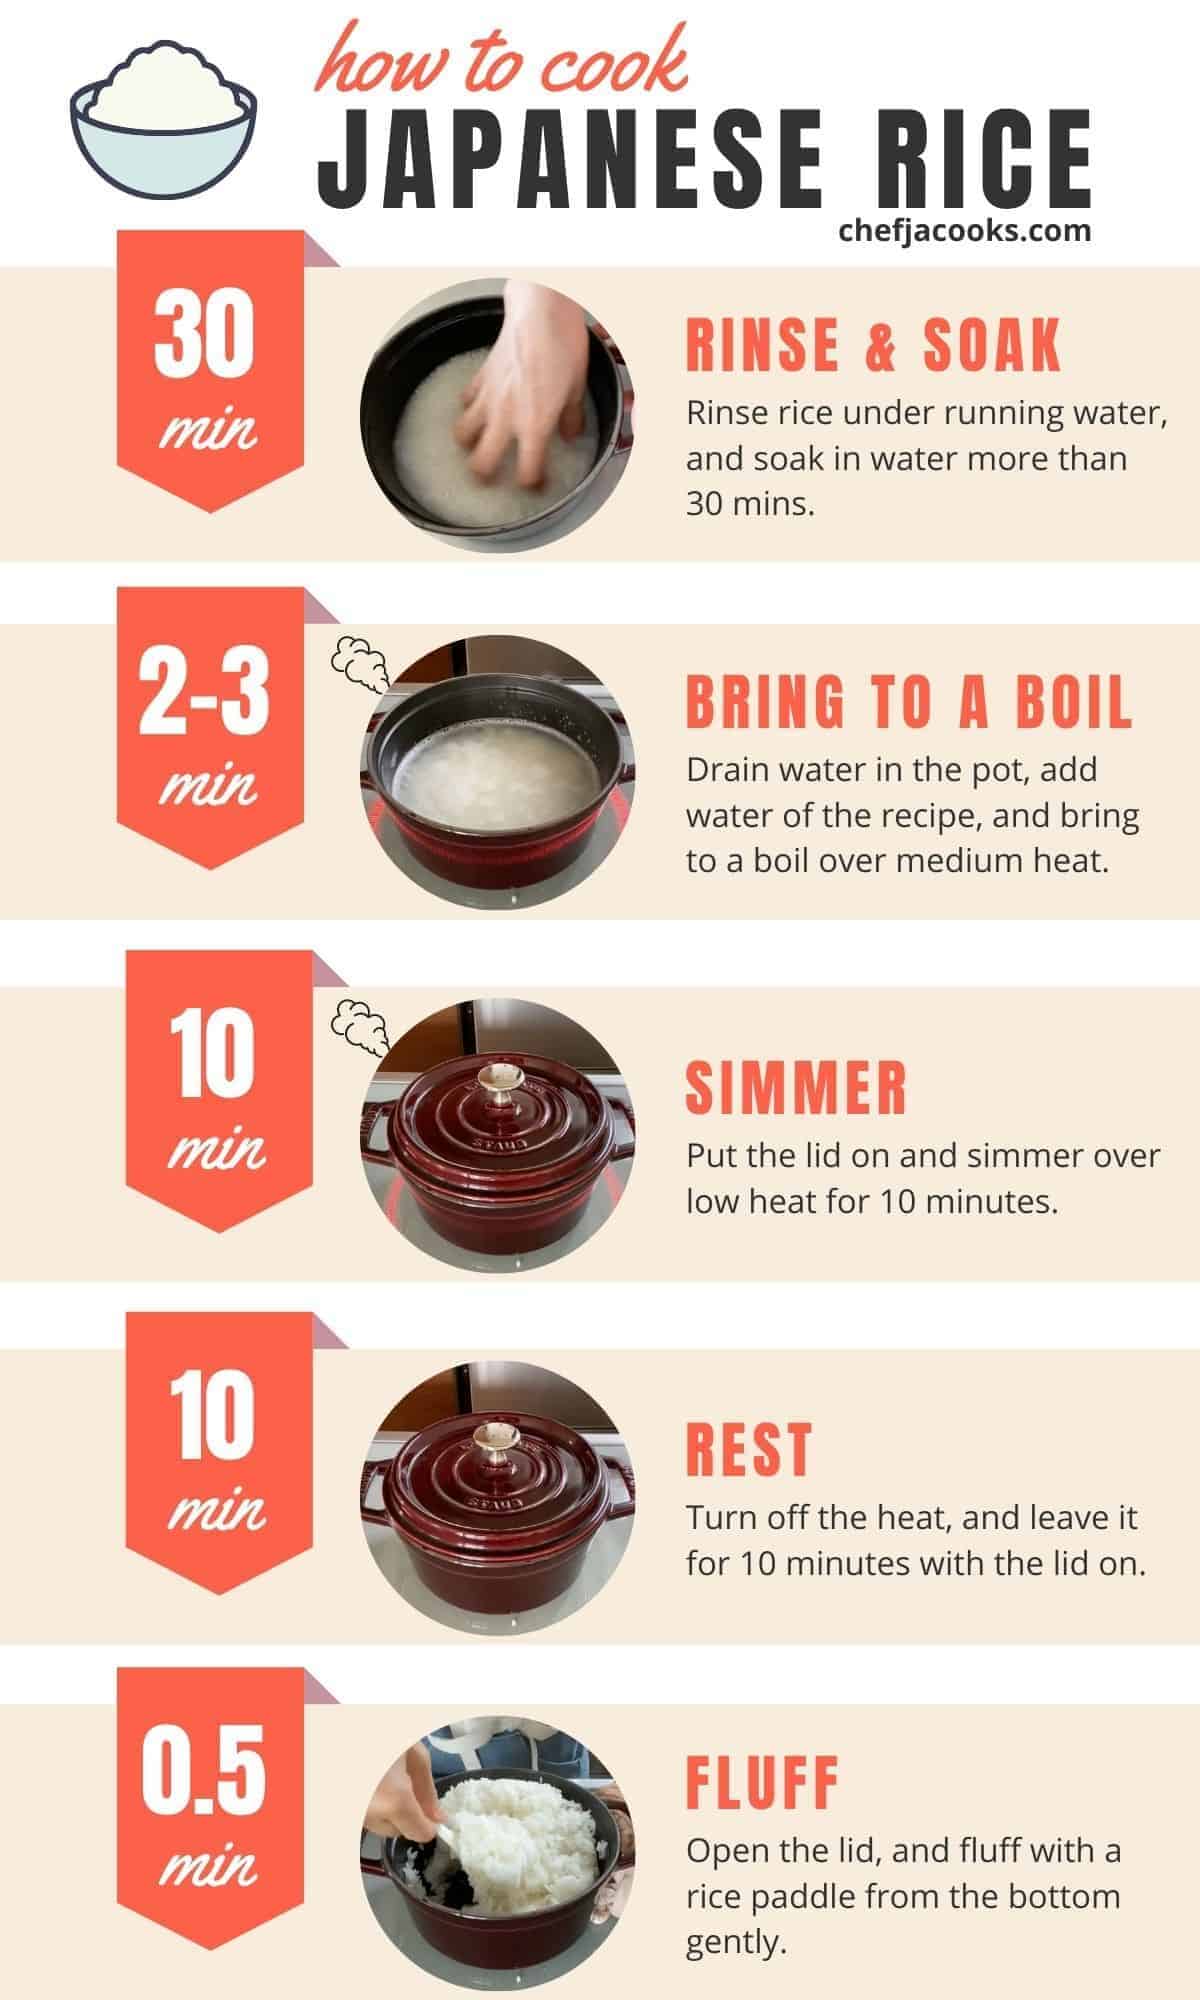


It turned out perfectly.
Thanks for trying the recipe, Ella! I’m so glad to hear that!
Thank u 🙂
Thanks for your comment, M! You are very welcome!
I wonder if you have tried the Staub rice cooker and if it makes any difference to a normal Staub cocotte.
Hi Carrie, I haven’t tried the Staub rice cooker (cocotte de Gohan), but I heard that it tastes better and has more umami and sweetness because of the form of the pot. I would love to get one!
I’ve just heard about natto for the first time and like the idea of having it for breakfast, so I got to this recipe interested in cooking rice to have with it. A few places I’ve seen it mentioned that natto is good for breakfast, but if it takes almost an hour to cook the rice how do you have it ready quickly enough in the morning? I live alone, would you recommend to cook a small amount daily or do a big batch and reheat some each morning? Thanks in advance for your suggestions.
Thanks for your comment, Isabel! I will recommend cooking a batch and freeze. Just follow the recipe (cook 2 cups of rice), wrap one serving in cling wrap, and freeze them. You will have 6 to 8 servings like the picture in the Storage section. And when you eat rice, microwave it. That’s what I do! This way, you will save more time than cooking a small amount of rice, and the taste is almost the same as fresh rice. If you have more questions, please let me know!
Thanks for the information! I love Japanese food and want to learn how to prepare for myself. Got to start with the basics…start with rice !!!
Nice!! I’m so happy to hear that:) I hope you enjoy Japanese starchy rice!!