Homemade Miso Paste Recipe (A Simple Guide for Beginners)
Are you interested in fermenting your own probiotic-rich foods? If so, try this Miso Paste Recipe! You can easily create this flavorful Japanese condiment at home!
Looking for how to make white miso paste? Try this quick white miso paste recipe, ready in just one day!

I’ll walk you through the ingredients and step-by-step instructions. I hope you enjoy it!
Why You Will Love This Recipe
Recipe Ingredients
You’ll need the following ingredients to make this Miso Paste Recipe:

Equipment
Here are some handy and essential tools for making miso paste.
How To Make Miso Paste: STEP BY STEP
Here are some quick visual instructions! For the video and all the detailed ingredients and instructions, go to the printable recipe card below.

Step 1
Soak the soybeans and cook in a pressure cooker.

Step 2
Break rice koji into pieces and mix it with salt.

Step 3
Mash the soybeans using a food processor until smooth.

Step 4
Combine the mashed soybeans, rice koji, and sea salt.

Step 5
Form the balls and pack them into the container, pressing with your fist.

Step 6
Cover the surface with plastic wrap and place a weight on it.

Cover the surface with a cloth to prevent bugs and dust, and store in a cool place. Let it ferment for six months to a year.
Where To Ferment Miso Paste
Miso fermentation takes place at room temperature, not in the refrigerator. Find a cool, dark place out of direct sunlight for your container. Suitable spots include a storeroom, basement, pantry, entrance area, or under-floor storage. In my case, I like to keep mine in a pantry under the stairs.
One Month Fermentation Check

Once you start fermenting miso, check its progress after one month. You might notice a liquid rising to the surface—called “miso tamari.” Miso tamari is a highly concentrated miso extract that separates during aging. Don’t discard it! This liquid forms a protective layer, preventing the miso from direct air contact and safeguarding it from mold and bacteria.
If you don’t see any miso tamari forming, the weight may be too light. Add more weight and check again after a month. On the other hand, if the miso tamari is overflowing, the weight may be too heavy. In this case, try reducing the weight.
Dealing with Mold During Fermentation

If mold appears, remove the surrounding area with a spoon. If you see a fluffy white ring on the edge of the container, it is also a mold. Be sure to remove all of it and wrap the miso tightly to prevent air contact for further fermentation.
Signs of Properly Aged Miso: What To Look For
Here are things to look for to know if your miso is aged and ready to eat:
Final Fermentation Check

This is my 6-month miso. It has a pleasant savory aroma, and the taste is rich in umami with just a hint of sweetness. I was aiming for a lighter color, but that’s okay. Due to the extremely hot summer this year, fermentation progressed quickly, deepening the color even within 6 months.
Storage
Once your miso reaches a preferred taste after fermentation, simply store the container in the refrigerator to stop the fermentation process. You can also store miso in the freezer. It doesn’t freeze solid; it may become slightly stiff, but you can still easily scoop it out and use it.
Dive Deeper into Miso Paste!
Want to learn more about miso? Here are a few helpful guides:


Want more Japanese Plant-Based Ideas?
Get 10 Easy
Vegetarian recipes

More Miso Recipes You Will Love
Leave a Rating!
I hope you enjoy this homemade Miso Paste Recipe! If you try it, don’t forget to leave a rating to share your thoughts—I love hearing from you!
Homemade Miso Paste Recipe (A Simple Guide for Beginners)

Equipment
Ingredients
Instructions
- Soak the Soybeans: Place the soybeans in a large bowl. Cover them with plenty of water and let them soak overnight. They should double in size.
- Cook the Soybeans: Drain the soaked soybeans and transfer them to a pressure cooker. Cover with fresh water, close the lid, and heat over medium. Once pressure is reached, turn off the heat. When pressure is released, drain the soybeans, reserving the cooking water, and let them cool.
- Combine Koji and Salt: Place the rice koji in a large bowl, break it into pieces, and mix it with the salt.
- Mash the Soybeans: Mash the soybeans using a food processor until smooth. Add the reserved cooking water as needed to achieve a smooth paste.
- Add Koji and Salt: In a large bowl, combine the mashed soybeans, rice koji, and salt. Mix thoroughly until all ingredients are well incorporated. If the mixture is a little hard, add some reserved cooking water.
- Pack: Form the soybean mixture into balls. Pack them tightly into the container, pressing down to eliminate any air pockets.
- Ferment: Cover the surface with plastic wrap to prevent air contact, place a weight on it, and store it in a cool and dark place. Let it ferment for six months to a year.
- Store: Taste the miso, and when it reaches your desired ripeness, transfer it to a container for storage in the refrigerator.
Notes
- Removing air from the container is important, as gas can accumulate in gaps during fermentation and aging. Firmly shape each miso ball to squeeze out any trapped air before pressing it into the container.
- Wrapping the surface prevents mold growth. Tightly cover it with plastic wrap to create a barrier against air exposure and reduce the risk of mold formation.
- The weight should be approximately 30% of the finished miso. This recipe uses a 190 g can of food as a weight.
Video
Nutrition
This nutritional information is estimated and provided for general reference only.
Did You Make This Recipe?
Please leave a review!!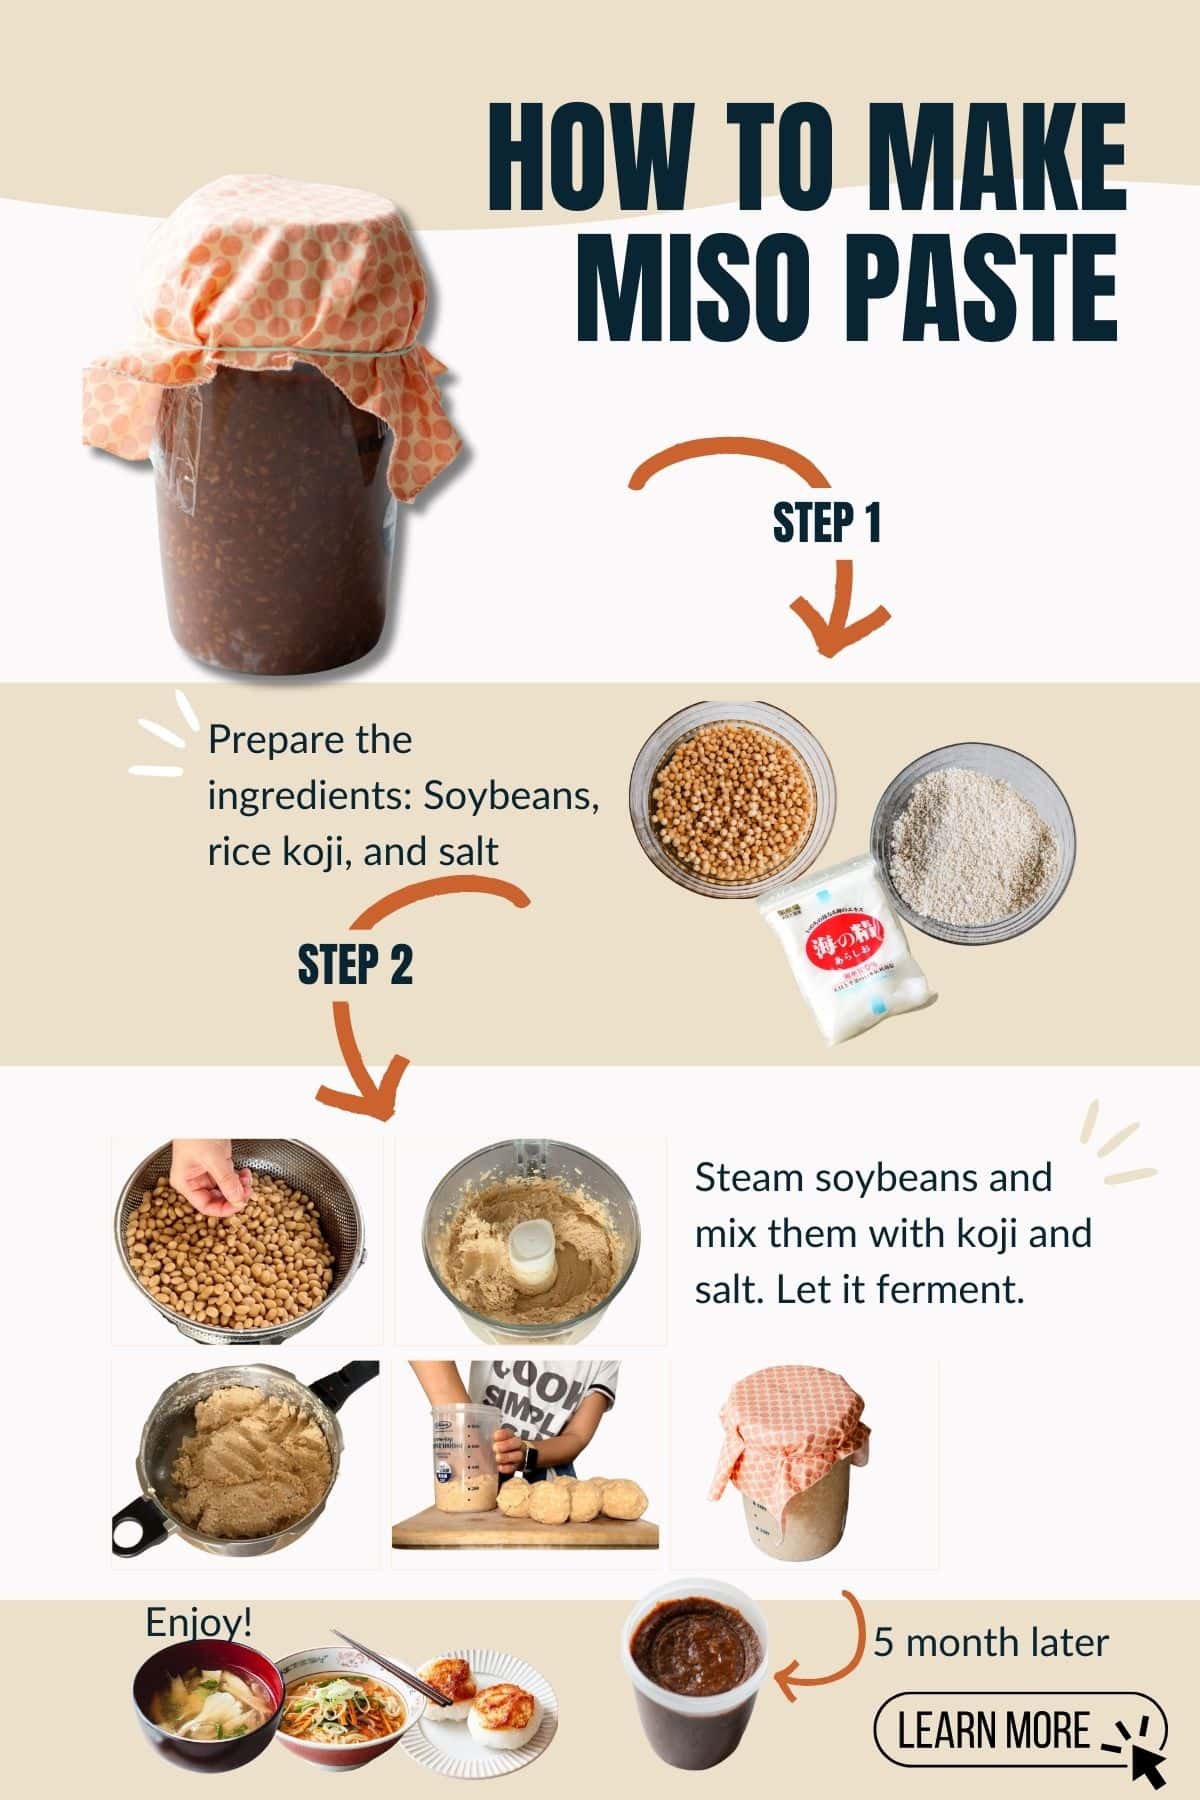


Thank you for visiting the comment section. Here, you can leave me feedback with a star rating. Readers like yourself may find comments helpful when making one of my recipes. I hope you love this one as much as I do!